Thursday, September 30, 2010

Produce bags are almost complete!

Last night was productive.  Working away, finishing produce bags, until I ran out of ribbon.  Grr!  So they will get finished over the weekend. 

The small stack that still need sewing, they are 1/3 done.
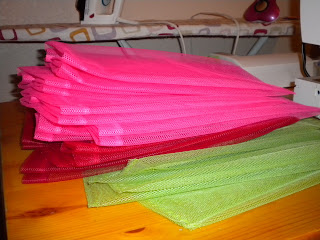
 Sewing all finished, just waiting for their ribbon...
 Look at all the pretty colors, so excited! 
 Stacked up and waiting...
 This is what's left to be finished, not too shabby.
So, as I said, a bit of ribbon to buy and these can be done.  

Now to work out their pricing.  What might you pay for a bag or a set of 3?  

Purses are next on my list...

Wednesday, September 29, 2010

Yo-Yo's...

These have been my evening project, watch for what's to come...

Friday, September 24, 2010

Not So Sweaty Bands...

If you read my last post on the main blog, you may have caught the little tidbit about me taking the plunge and setting up a booth at Cody's school's craft fair in Nov. So I've been working on things this week and actually finished the first set.

Not So Sweaty Bands...
I've used these while running and doing Zumba and they are great! They are absorbent and don't slip around. 36ish or so were made this week in an array of colors and prints.

Another item I'm going to be selling are reusable produce bags. I've gotten a good start, these ones are almost finished, just needing their ribbon ties.

Stay tuned for more...

Monday, August 23, 2010

Shirts to start the school year....

For the start of this school year, I've been searching all the department stores for their $3-5 plain shirts. Walmart had the best deal with their baseball style shirts and we were ready to go! He would love if I would buy him the latest Transformers, Hot Wheels, Toy Story type shirts, but they just date so quickly and I'm not into those sort of things. So we went for the fun and non-character route.
What's s a new year without a little tie-dye?

He thought the raft was really cool, just like this summer.


A new school shirt...


This picture just doesn't bring out the awesome that is the rocket shirt.

Hoping he'll let me do this for a couple of more years, we'll have to see!

Sunday, August 22, 2010

More Juice Pouch bags...

A purse for Selby, with girly fringe around the edges...

Cody's new lunch bag...


It also has a plastic liner inside (made from table cloth material) to help keep the cool in. The only problem I'm seeing with it is that it's pretty big. Big enough to fit all this...
My thought in making this was so that his divided container would fit, with an ice pack and drinks. We'll see how it goes, might have to rethink this and save it for picnics.

More to come...

Sunday, July 18, 2010

Tea Towels...

This past Christmas my mom asked me to make her a new set of tea towels as the ones she had from Grandma were disintegrating a little more with each use. They didn't have to be sent at Christmas, but that's what she wanted. It took me a while to get them going, but once I did, it was pretty quick work. She left the details up to me, so it was a bit of a surprise.

The 1st four are made out of old flour sacks that she had and gave to me to use for the project. These were very easy to sew and embroider.
The other five were made out of cloth diaper material I bought at the fabric store. They should be absorbent, weren't too bad to sew or embroider, although the fabric has a bit more stretch that can cause some bunching.


I didn't take a picture of the backs, but I did fuse some cotton onto the back of the embroidery as to hopefully save it from wear, then stitched around the edge so that it stays together through washings.

Almost like Grandma would have made!

Thursday, July 15, 2010

Freezer Paper Stenciling...

I've heard about it for a while and finally had a chance to give it a try. I'm in love! It's an easy process, but a bit time consuming because you have to cut out images with the exacto knife, and try to figure out what part should be painted or not. Google it, there are some great tutorials out there.


For our dino lovin' buddy...

Ty's new stash.

Need to get some new dyes as I'm starting to use my fall back that really turn out a bit disappointing!

Friday, June 11, 2010

More crafty gifts...

So another of my go-to baby gifts, a tag blanket for our neighbors across the street that just welcomed home a baby boy.

A couple of months ago I made a bag and clips for Ms. C, her sister Ms. M is turning 4 next week and I thought it was only fair that she had a bag to all her own. The idea came from the latest JoAnn's ad that featured a bandanna bag. I pulled up the instructions and became confused and winged it a bit to create this. It turned out cute, but could use some tweaking....

Having so much going on I went to my friend Charlene for clips this go. Adorable!

Visit her Etsy shop here, to find many others that are perfect for all your girly occasions.

Saturday, May 29, 2010

Recycled Gifts...

Two of our friends are having Birthday parties this weekend, so here's an easy project that will be lots of fun for the recipients!
Drink Pouch bags....
Go Here for the instructions I used. The first one took about an hour because I was going between my sewing machine and the computer because I didn't feel like printing it out. The second was closer to 30 min.

These are easy to make in customized sizes, just add more pouches. The boys want a "cool bag" so I'm planning on making them each a lunch bag that will hold our new divided food containers.

Wednesday, May 5, 2010

Teacher Appreciation Cards

One of the last tasks I've taken on for PTA this year was to make invitations to the teacher appreciation lunch. They were simple, but turned out cute. Pretty paper with a solid color back, then took coordinating solids and stamped the saying on the front, sprinkled with embossing powder, heated them and attached them with 1mm foam squares. These are postcard style, with the invitation information printed directly from word.

This is also the same style I made Thank You cards for the people the made private donations for the auction.

Wednesday, April 7, 2010

More party crafty...

Here's the rest of the crafty from Cody's Birthday party.

Crafty doesn't just come from the crafty cave, it comes from the kitchen as well.

Broken Glass Jello was a hit at the party
Couple of hints though...
I used the large boxes of Jell-o instead of the small as she has in the recipe. Worked okay, but I forgot to double the milk mix, and tried to add in some plain gelatin water. It didn't quite mix together right, but they tasted okay. So if you use the large boxes, mix those with 2 cups of hot water and double the milk mix.


The last time we went to visit the climbing place on a Saturday, it was packed with people. We did come to find out they were hosting an event at that time. So to help keep track of our party goers, I made some tie-dye shirts and ironed on a climber dude using iron on printer paper.

Monday, March 29, 2010

Birthday gifts for a friend of Cody's...

I love that boys have friends that are girls, it means I get to pull out some girly crafty!

Trying not to spend a lot of money right now I dug through my fabric stash and decided to make a purse for Cody's friend. Here's the finished product...


Also wanting to make sure she was accessorized to the nth degree, some flower hair clippies.
My beautiful models, always so willing to help me show off creations, even if they are girly.


Happy Birthday Miss C!

Wednesday, March 24, 2010

$3 Easter Wreath...

Here is a very easy and inexpensive project to add a little spring to your home. The local dollar store has garland with sparkly eggs attached and plain wooden wreathes like this:

Using a glue gun, put a dab of glue on the back and press one end of the garland to it. Let it dry for a minute or so, then simply wrap the garland around the wreath so that the wood is covered, gluing the end as well. My 12" wreath needed two strands of garland, not realzing this I only bought one the first trip, and when I went back they didn't have anymore yellow. So I wound the yellow around, leaving gaps and filled them in with the white. Here's the finished product:

So go forth and be crafty!

Monday, March 15, 2010

All about me...

Next week at school Cody gets to be the VIP for the week because his Birthday falls the following week while they are on spring break. One part of being VIP is bringing in a poster of pictures, so here's what we did. Pretty simple, cover the poster board with checkered paper, then did a border in blue dots, cut out his name and Birthday using Zooabaloo.

Should be a fun week! He also gets to take something to share every day and a treat for his class on Friday.

Wednesday, March 10, 2010

Goody, Goody....

Last night I was able to finish the decorations for the goody bags for Cody's party.

At school, most days, they play "dinosaurs," which is basically running around screaming at each other. They used to "eat" each other, but that got them in trouble, so now they just run around and roar. Of course this T-Rex is riding a red razor like Cody's, pretty cool.

Monday, March 8, 2010

Pictures to hang....

My friend Sarah posted some pictures at Christmas time with sayings displayed in 4 frames, it was the cutest thing. She said she found the idea at Pottery Barn. So I've been wanting to do the same thing to hang over the TV and have finally finished the first set. My plan is to change it out with the seasons, or holidays.

Here's the new collage over the TV...


The second picture project I've been working on are school days frames for the boys. These frames were found at Micheal's with the mat already cut, I added scrapbook paper and some number/letters from Cricut.

Wednesday, March 3, 2010

Pillows and Parties...

Cody's Birthday is at the end of the month, so I'm working on all the things to make it happen.

First to be done were the invitations. Pretty simple this go, with the help of Photoscape, printing at Target, and a simple boarder and number. The inside is just printed from the computer, although it is with blue ink, to keep it festive.

For his main party, we are going to a climbing gym, so not much is needed for decoration. All that I need to get are some table clothes for the party spot. I'm planning on getting plain colored ones, to keep the cost down, but thought I would spruce up the food table with a banner.


My Celebrations cartridge for the Cricut has the triangle banner image, so just picked a font and cut and paste. Strung onto orange ribbon in hopes that it won't stretch and dip too badly, then each triangle has tape on the back to hold them into place.

The next 1/2 finished project has been almost 2 years in the making. When we moved over to the new house my friend Jen gave me some pillows, I've had high ambition to do some pretty quilted designs, but came to realize I just didn't have that in me. So I finally bit the bullet and found some nice home decor fabric on sale at JoAnn's and started. The pillow slides in and out of the back, with a velcroed split across the back, easy washing for the accidents that tend to happen here.


I say 1/2 finished because I need to make two more for the other couch so we can toss the crappy pillows we've had for too long.

More to come...